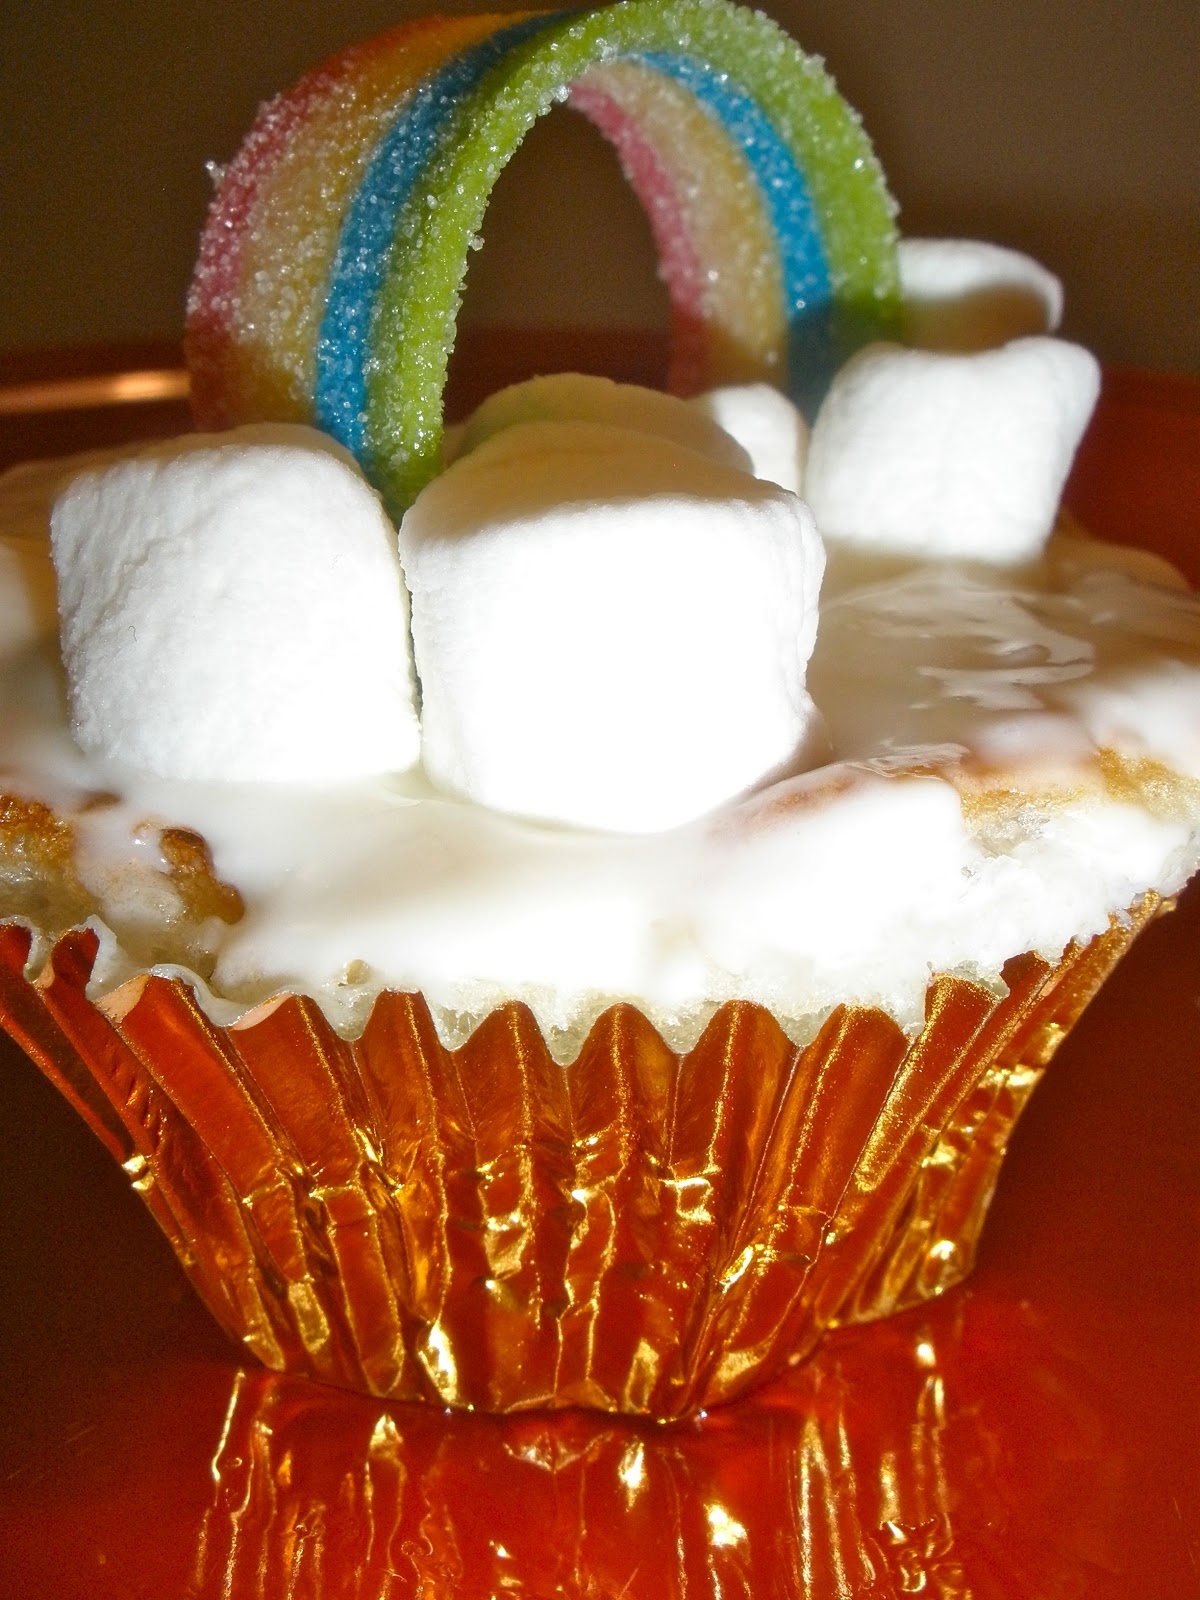
Saturday, March 17, 2012

Pot o' Gold Cupcakes

Here's a simple idea for St. Patrick's Day.

What you'll need:
Airheads Xtremes (for the rainbow)
Baby Marshmallows (for the clouds)
Frosting
Cupcake mix
Gold cupcake wrappers (as the pot of gold)

Saturday, February 25, 2012

Is it okay to call this trail mix?

The other day I was rummaging through my kitchen cupboards looking for a tasty snack.  Because I'm a broke college student, I decided to be creative with what I had.  I was surprised when my spark of creativity was actually delicious.

Ingredients:
3/4 c Honey Nut Cheerios
1/4 c Raisins
1/8 c Shredded Coconut
1/8 c Cashews
*This makes 2 servings

I'm really tempted to add peanut-butter chips and craisins into the mix... maybe when I have more money...

Sunday, February 19, 2012

The easiest candles you will ever make


Materials:

-Candle wax (Walmart sells GREAT Better Homes brand scented wax cubes, and they're like $0.80)
-Candle wicks
-Glass Jar (I recycled pesto sauce jars)
-Double Boiler (or a makeshift one)

1.  Melt Wax
To melt your wax, first cut the cubes into smaller pieces, this will make the melting process go more quickly.  
Make sure the water in the bottom pot is boiling then turn it to medium heat.  Put the wax in the top pot and wait until it is completely melted.


2.  Place Wick

Make sure the candle wick is where you want it before you pour in the wax.  There are many ways of doing this.  Personally, I like to just eyeball it and hope for the best (I use a spoon to keep it from falling over).  However, you can use non-flammable glue like hot glue to secure the base of the wick to assure it will be centered.

3.  Pour
Pour hot wax into the jar.  Be careful not to move the jar too much before the wax has solidified.  

4.  Wait
If you're making a multi-layered candle, it is important to wait for the wax to solidify before pouring in the next layer.  To speed up the process, you can place the jar in ice cold water (make sure water doesn't spill into the candle) or place the jar in the fridge or freezer.

5.  Layer
Continue pouring layers until you're satisfied. Be sure to keep about half of your final wax layer for the next step.

6.  Fill
After about 12 hours, you will see your candle develop a hole in the middle.  This is worse in higher elevations, I found.  To fix that hole, simply pour in more wax.  Be sure to wait until the hole has fully developed (about 12 hours) or you will just have to refill it again.


7.  Done!
Here are the scents I used:

For the Yellow/Orange/Pink candle
-Hawaiian Pineapple Cilantro 
-Pomegranate Passion Fruit
-Wild Island Fruit

For the Gray/Purple/Pink candle
-Homemade Blueberry Muffins
-Wild Berry Tart
-Vanilla Cinnamon Sugar

For the beer-looking candle
-Orange Buttercream Cupcake
-Butterscotch Maple Cream
-Vanilla Caramel Spice


Saturday, February 11, 2012

Hand and Body Scrubs

Lemon Hand/Body Scrub
Ingredients:
2 tbsp lemon zest
2 tbsp lemon juice
1/2 cup safflower oil
1 1/2 cup granulated sugar

Vanilla Hand/Body Scrub
Ingredients:
1 tsp vanilla extract
1 tbsp finely chopped vanilla bean
1/2 cup safflower oil
2/3 cup brown sugar
2/3 cup granulated sugar

*The type of oil doesn't REALLY matter, but I like safflower oil because it's not smelly (like olive oil), it's colorless, and it's a great moisturizer.  Sunflower oil is a slightly cheaper alternative, however.*

Make sure you store your scrubs in an airtight container, like a mason jar...
The oil will separate a little, so take caution when opening your jars.

Enjoy your super soft hands :)

Tuesday, January 31, 2012

Valentine's Cards

Cards with Blow Pop faces...

Butterfly:
"You make my heart flutter!"

Octopus:
"I can't wait to wrap my arms around you!"

Elephant: 
"You're unforgettable!" 

Bumble Bee:
"Will you bee my valentine?" 

Turtle:
"Shell you be my valentine?"

Snail:
"Time stands still when I'm with you!"

+   +   +   +   +

 Cards with AirHeads tongues...


Alligator: 
"I'd snap at the chance to be your valentine!"

Hippopotamus:
"You mean a ton to me!"

Porcupine: 
"You make my heart-rate spike!"


Whale:
"You're a whale of a catch!"

Kitty Cat:
"You're a kitten's meow!"

Wolf:
"You mean the moon to me!"

Panda:
"You're unBEARably cute!"

Giraffe
"You put my head in the clouds."

Jaguar
"You're purrfect!"

My puppy Lola... 
the Airhead was eaten before I could take a picture.


Enjoy :)

Sunday, January 15, 2012

Homemade Buttons

Yay buttons!!!

Materials:
Polymer clay
Ziploc Bag
Straw
Cookie Sheet
Clay Glaze
Paintbrush

1) Conditioning your clay
Polymer clay needs to be conditioned before use.  First, you have to warm up the clay.  I like to do this by putting the clay I'm going to use in a ziploc bag and then sticking that ziploc bag in my pocket for about five minutes.  Next, I squish it with my fingers until it feels like playdough.  If the clay seems to hard, you can use clay softener.

2) Roll your clay
Roll your clay into a ball. Remember: the bigger the ball, the bigger the button.

3) Squish!
Place your ball of clay on a ziploc bag and fold the bag over so both the top and bottom of the ball are covered.  Use a butter knife, or anything with a flat surface, to squash your ball into a button-ie form.  

4) Making Holes
Use a straw/coffee stir to cut button holes.

5) Bake!!!
Follow the instructions on your clay packages.  Generally it's 30 minutes at 275 °.  Because buttons are thin, 20 minutes should do.
 
6) Making them shiny
Apply the glaze to the buttons.  Paint one side at a time. 
 
7) Done!
Now go make a button bracelet...  

Friday, January 13, 2012

Polymer Clay Earrings

The idea behind polymer clay earrings is fairly simple, but managing to create two identical earrings involves a lot of trial and error.
Materials:
Polymer Clay (I like Sculpey)
Earring Hardware
Polymer Clay Glaze
Paintbrush
Baking Sheet
Parchment Paper (Optional)

1)  Conditioning your clay
Polymer clay needs to be conditioned before use.  First, you have to warm up the clay.  I like to do this by putting the clay I'm going to use in a ziploc bag and then sticking that ziploc bag in my pocket for about five minutes.  Next, I squish it with my fingers until it feels like playdough.  If the clay seems to hard, you can use clay softener. 

2) Roll your pieces
Since you're going to be making two identical earrings, it is important to use the same amount of clay for each earring.  If you want, you can use a gram scale for more precise measurements, but the less expensive alternative is to simply eyeball it.  When rolling out your clay, make sure the two pieces are the same length and width.
 
3) Shaping your pieces
Shape your clay pieces to your desired shape.  Cut your piece where you want to insert your hardware.

4) Adding your hardware
When inserting the earring post it is important that the clay covers the cap.  If it isn't covered, your earrings can separate from the post after the clay is baked. Earring backs are a little more tricky.  There are three types of earring backs.  Earnut backs don't work.  Earring clutches work better, but they're big and don't allow for a lot of flexibility.  Plastic backs are your best bet, but plastic melts in the oven.  I simply stick the plastic backs in the clay and let it bake.  A minute or two after I take the earrings out of the oven (while the plastic is still melty), I stick in an extra post as to mold the inside of the earring.  Take the post out after two or three minutes or the post will become permanent.

5) Bake your earrings!
Follow the instructions on your clay packages.  Generally it's 30 minutes at 275 °.

6) Cooling
Let your earrings cool for a few minutes.  This would be the part where, if you're using plastic backs, you stick in the earring posts.

7)  Applying glaze
Dangle your earrings from somewhere, anywhere.  This will prevent the glaze from gathering in unwanted places.  Now you can apply the glaze.  Follow the directions on the bottle.  Most glazes require a half hour between coats, so keep that in mind.  Make sure your coats are thin.

8) Let dry
I like to let my earrings dry for a couple hours. Overnight is ideal.

9) Wear!


Thanks, Hannah for being my model!!!

Crayon Art

So I decided to try one of these crayon art things, and I was surprised at how easy this project is. 

Materials:
Canvas
Crayons

Hot Glue Gun
Blow Dryer

Steps:
1.  Hot glue crayons to canvas.
2.  Blow dry crayons.
3.  Let dry.
4.  Done.


Simple right?  There are a few things I discovered while doing this project:
1.  Hold the canvas angled back so the crayons can run better.
2.  The blow dryer has to be on hot but on the low setting.
3.  Hold the blow dryer as close to the paper part of the crayons as possible to avoid splattering.

Sunday, October 30, 2011

DIY Screen Printing

What you'll need:
exacto knife
freezer paper
fabric paint (I like the dimensional kind--it's looks more like the real thing)
paint sponge brush
scissors
iron
cutting board or self-healing mat 
piece of cardboard
something to screen print (t-shirt, canvas bag, etc.)
access to a printer (optional)


1) Pick your design!
Easy enough, right?  Just keep in mind: the simpler the better (especially if it's your first time). 


2) Preparing your design!
There are two ways to go about this: printing or drawing.   Printing your design is relatively less time-consuming, but it's a little more of a hassle.   When printing your design, you first have to cut the freezer paper to a standard 8.5" x 11" size.  This is really simple if you have a rotary tool and a self-healing mat; if you don't,  it's okay to trace a regular sheet of paper.  Next, load your printer with the freezer paper sheet.  Make sure your printer is loaded so your design prints on the dull side of the freezer paper.  Then simply print your design!  If you're drawing your design make sure to draw it onto the dull side of your freezer paper.


3) Cutting out your design!
Simply take your exacto knife and start cutting.  If you're not cutting a solid shape remember to keep all the pieces you cut out.  You'll need them later.


4) Iron on your design!
Once you've finished cutting all your pieces, it's time to iron them on your fabric. Make sure your freezer paper is fully adhered to your fabric before you begin the next step.


5)Painting!
Before you start painting put the piece of cardboard directly under the fabric you're painting on.  The paint will bleed through if you don't.  
Use the sponge brush to paint on the fabric paint.   It is best not to squeeze the paint directly on the fabric.  The application of the paint itself isn't too important.  You can dab it on or brush it on, it just depends what you're going for.  You don't even have to fill it in all the way.  It's entirely up to you.
Also, lighter color paints do show up on darker fabrics, so be creative with your color choices! There's no need to limit yourself to black and white :)


 6) Let it dry!
Follow the drying instructions on the bottle of fabric paint you use.  I like to let it sit overnight just so I'm certain it's dry.
 
7) Peel off the freezer paper!
Carefully and slowly peel off the freezer paper.  Curves and corners can be tricky, but if you go slowly you'll have a better chance not ripping the freezer paper.  In the event you do rip the freezer paper, don't worry.  Try to take off as much as you can, but if it doesn't all come off, it will when you wash it.  Just keep in mind, most fabric paints require a 2 day setting period before the first wash.  Just read the bottle and you'll be fine.

8) Wear!


Friday, October 28, 2011

Halloween Cards


Here are some examples of Halloween cards I've made.  I primarily use card-stock paper and permanent double-sided tape.  I avoid glue because it warps the paper.  Enjoy!